How to Take Good Feet Pics: Poses, Ideas & Photography Tips
Taking a picture of your feet is easy. Taking one that looks sharp, well-lit, properly framed and intentional takes a little more thought.
You do not need an expensive professional camera or complicated studio equipment to get started. A recent smartphone, good light, a clean background and better camera positioning can improve a photograph more than buying new gear.
The goal is not to make every image look heavily edited or overly staged. It is to create clear, consistent photos where the lighting, pose, framing and overall presentation work together.
This guide covers the full process: camera setup, lighting, backgrounds, angles, feet pic poses, content ideas, examples, foot-photography techniques, high-resolution shooting, editing and privacy.
If you are taking photos for a FeetFinder profile or seller listings, these same principles apply whether you are preparing your first shoot or improving an existing content library.
Quick Answer: How Do You Take Good Feet Pics?
To take good feet pics, start with enough light and a simple background. Clean the camera lens, use your phone's main rear camera when practical, tap directly on your feet to set focus and avoid excessive digital zoom.
Take several versions of the same setup instead of expecting the first photo to be perfect.
A strong feet picture usually gets five things right:
-
Sharp focus
-
Clear lighting
-
Intentional composition
-
A non-distracting background
-
No unwanted personal information in the frame
Before uploading, zoom in and inspect the entire picture - not just the feet.
What Makes a High-Quality Feet Picture?
“High quality” does not simply mean a large image file.
A blurry 20-megapixel photograph is still blurry.
Several elements need to work together.
Sharpness
The main subject should be properly focused. If the toes are sharp but the soles are the intended focus and appear soft, increasing the resolution will not fix the photograph.
Lighting
Good lighting helps the camera capture detail and reduces the grainy or muddy appearance common in darker rooms.
Composition
Someone viewing the picture should immediately understand what the main subject is.
Background
The background should support the image rather than compete with the feet.
Resolution
The image should contain enough real detail to remain clear at its normal viewing size.
Consistency
If several photographs belong to one set, similar lighting, color, styling and backgrounds can make the collection feel more deliberate.
For most beginners, improving the lighting and framing will have more impact than replacing the camera.
Phone vs Camera: What Do You Need?
A smartphone is enough for most people getting started.
Modern phones handle focus, exposure, color processing and image stabilization automatically. That is particularly useful when taking your own photos.
A dedicated camera gives you more control over lenses and manual settings, but it also adds cost and complexity.
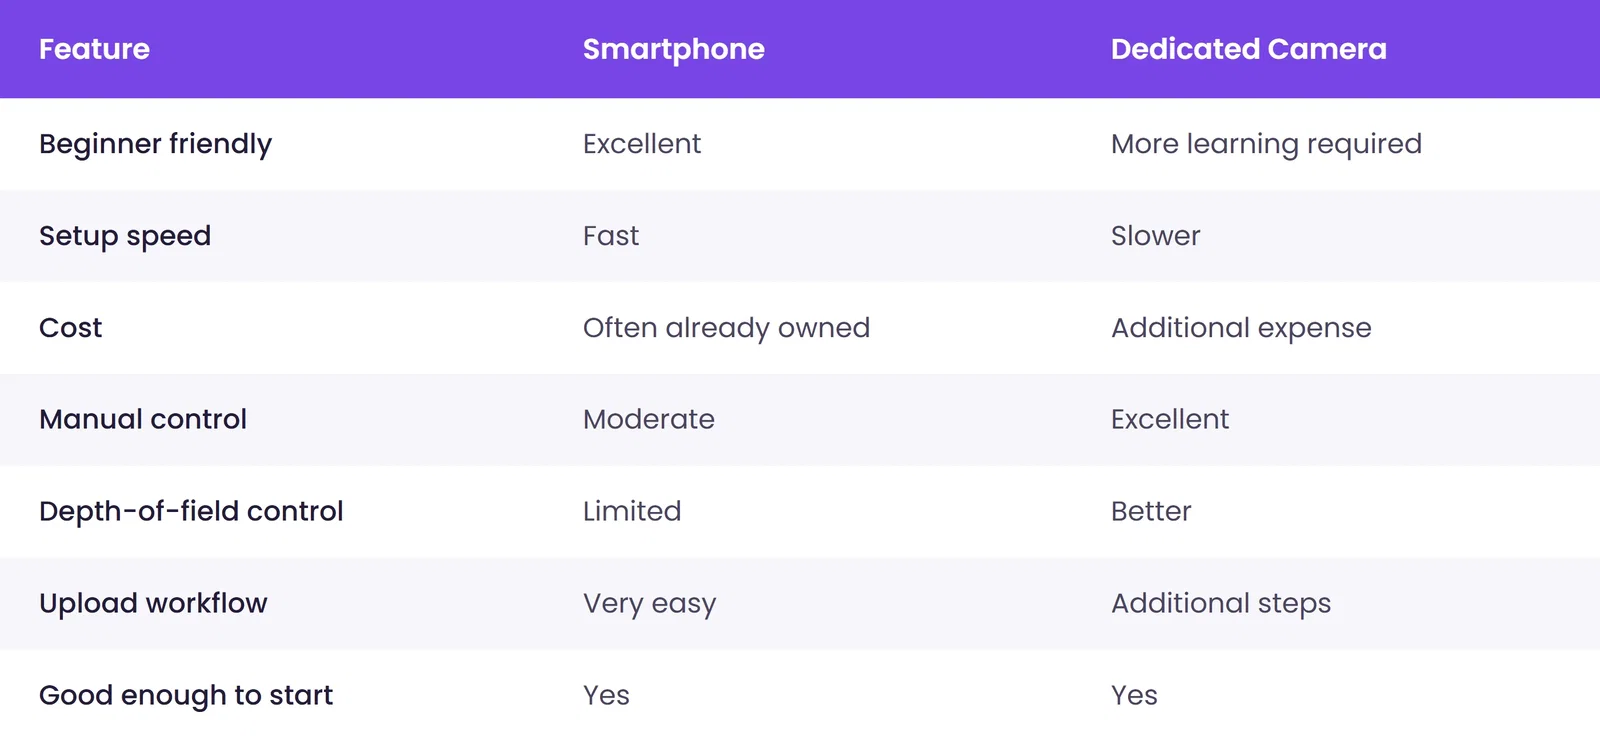
If your phone already captures clear photographs in good light, use it before spending money on more equipment.
Best Lighting for Feet Pictures
Lighting has a bigger influence on a photograph than many beginners expect. You can have the right pose and a good camera, but poor lighting can still make the finished image look flat, noisy or unclear.
Natural Window Light
For beginners, a large window is one of the easiest light sources.
You do not have to place your feet directly against the window. Try positioning yourself a few feet away and rotate slightly until you get visible shape without harsh shadows.
If yellow room lighting is competing with daylight, turn it off and compare the result. Mixed light can create strange color differences across the image.
Direct Sunlight
Direct sunlight creates stronger contrast. It can work well, especially outdoors, but pay attention to bright highlights and very dark shadows.
If parts of the feet become completely white with no visible detail, lower the exposure slightly or move into softer light.
Golden Hour
Light around sunrise or sunset can create a warmer, softer look. It works well for outdoor photography but should be treated as a stylistic option rather than a universal rule.
Ring Light
A ring light is useful for predictable indoor lighting. It can sometimes make the image look flat when positioned directly in front of the subject.
Try moving it slightly to one side or above the camera.
Softbox
A softbox provides softer, more controlled indoor lighting. It can be useful if you regularly photograph in the same room, but it is not something every beginner needs to buy.
Simple beginner setup: large window + clean background + indirect daylight + main phone camera + no conflicting indoor light. Then take a test shot before completing the full setup.
Best Backgrounds for Feet Pics
Your background does not have to be elaborate. Simple often works better.
Useful options include:
-
Clean bedsheets
-
A neutral wall
-
Wood flooring
-
A rug
-
A sofa
-
Studio paper
-
A simple outdoor setting
-
Sand or poolside environments where appropriate
Ask yourself one question: Does this background help the photograph, or does it distract from the feet?
For example, a textured blanket may suit a cozy sock-themed shoot, while a plain floor may work better for sneakers.
Before shooting, remove unrelated objects from the frame. Laundry, packages, documents, computer screens and random cables can make an otherwise good image feel unfinished. Some can also reveal private information.
How to Compose Better Feet Photos
Make the Feet Large Enough
Unless the environment itself is important, avoid making your feet a tiny part of a huge room. Move the camera closer or crop the image more tightly.
Avoid Accidental Cropping
Cutting off the edge of a heel or toe unintentionally can make the photo look careless. Either include the full area or make the crop clearly deliberate.
Use Symmetry When It Helps
Soles, matching footwear and pedicure shots often work well with balanced framing.
Use Negative Space Carefully
Empty space can make a photo feel cleaner. Too much empty space can make the subject feel lost.
Take Portrait and Landscape Versions
Once you have a setup that works, photograph it in both orientations. That gives you more usable options without rebuilding the scene.
Best Angles for Feet Pictures
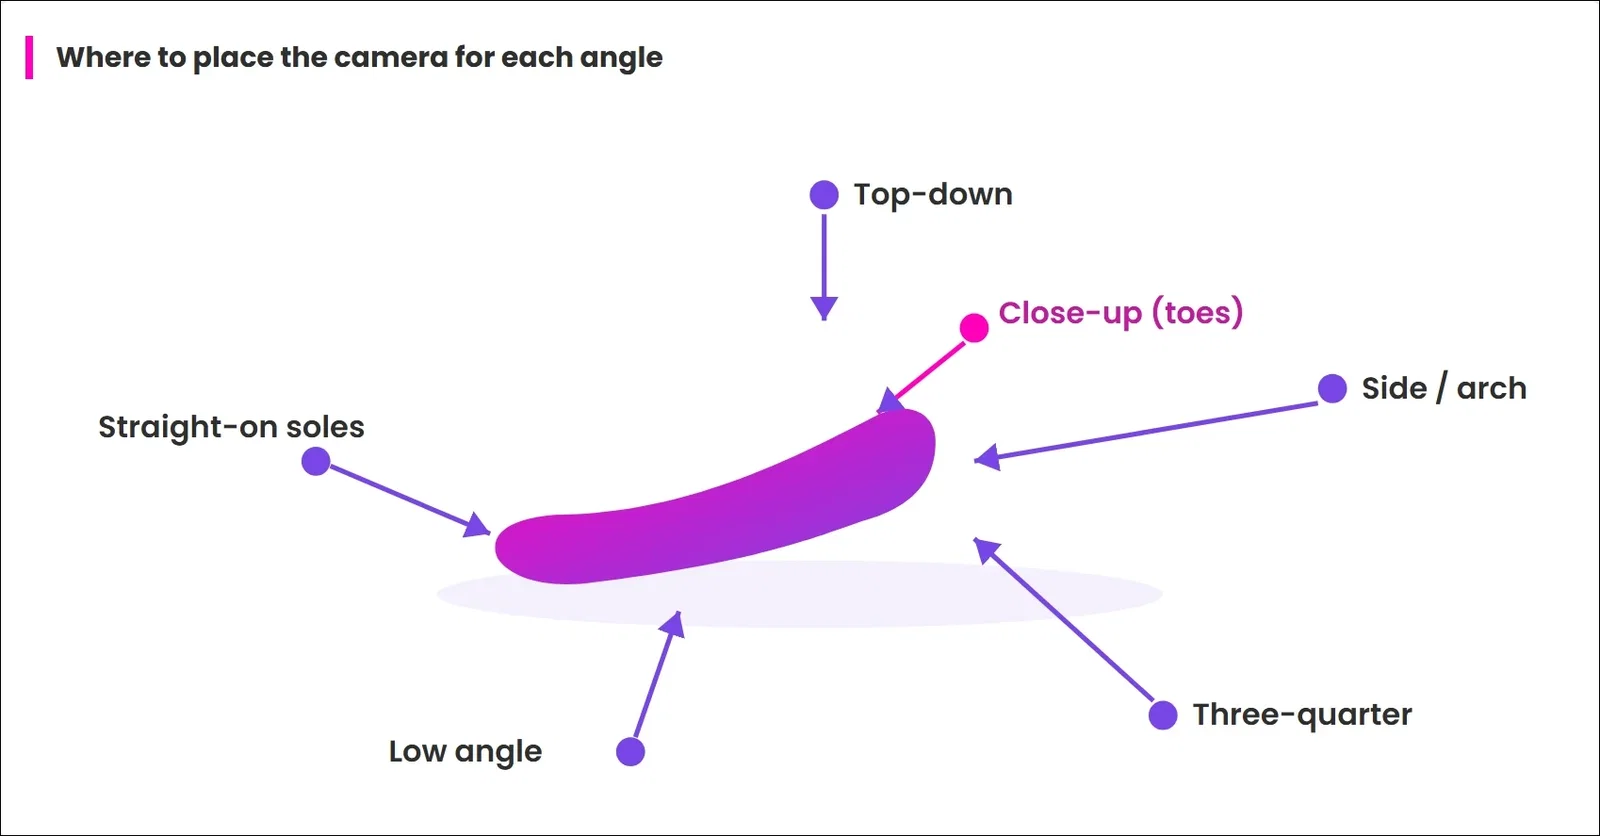
Changing the camera angle can completely change the appearance of the same pose.
Top-Down Angle
Photograph from above. Useful for toes, pedicures, socks, sandals and footwear. Keep the camera reasonably parallel to the feet if you want a flatter look.
Side Angle
Side views can emphasize arches, heels, ankles and footwear profiles. Try different camera heights rather than keeping the phone at floor level every time.
Straight-On Soles
Position the camera approximately in line with the soles. Check that one foot is not unintentionally much closer to the lens than the other.
Three-Quarter Angle
Position the camera between a front and side view. This often gives the image more depth than a completely straight-on composition.
Low Angle
A lower camera position can emphasize soles, shoes or arches. Watch for perspective distortion.
Close-Up
Useful for nail polish, toes, accessories, skin details and individual features. If using a phone, avoid putting an ultra-wide lens extremely close unless exaggerated proportions are intentional.
15 Best Feet Pic Poses to Try
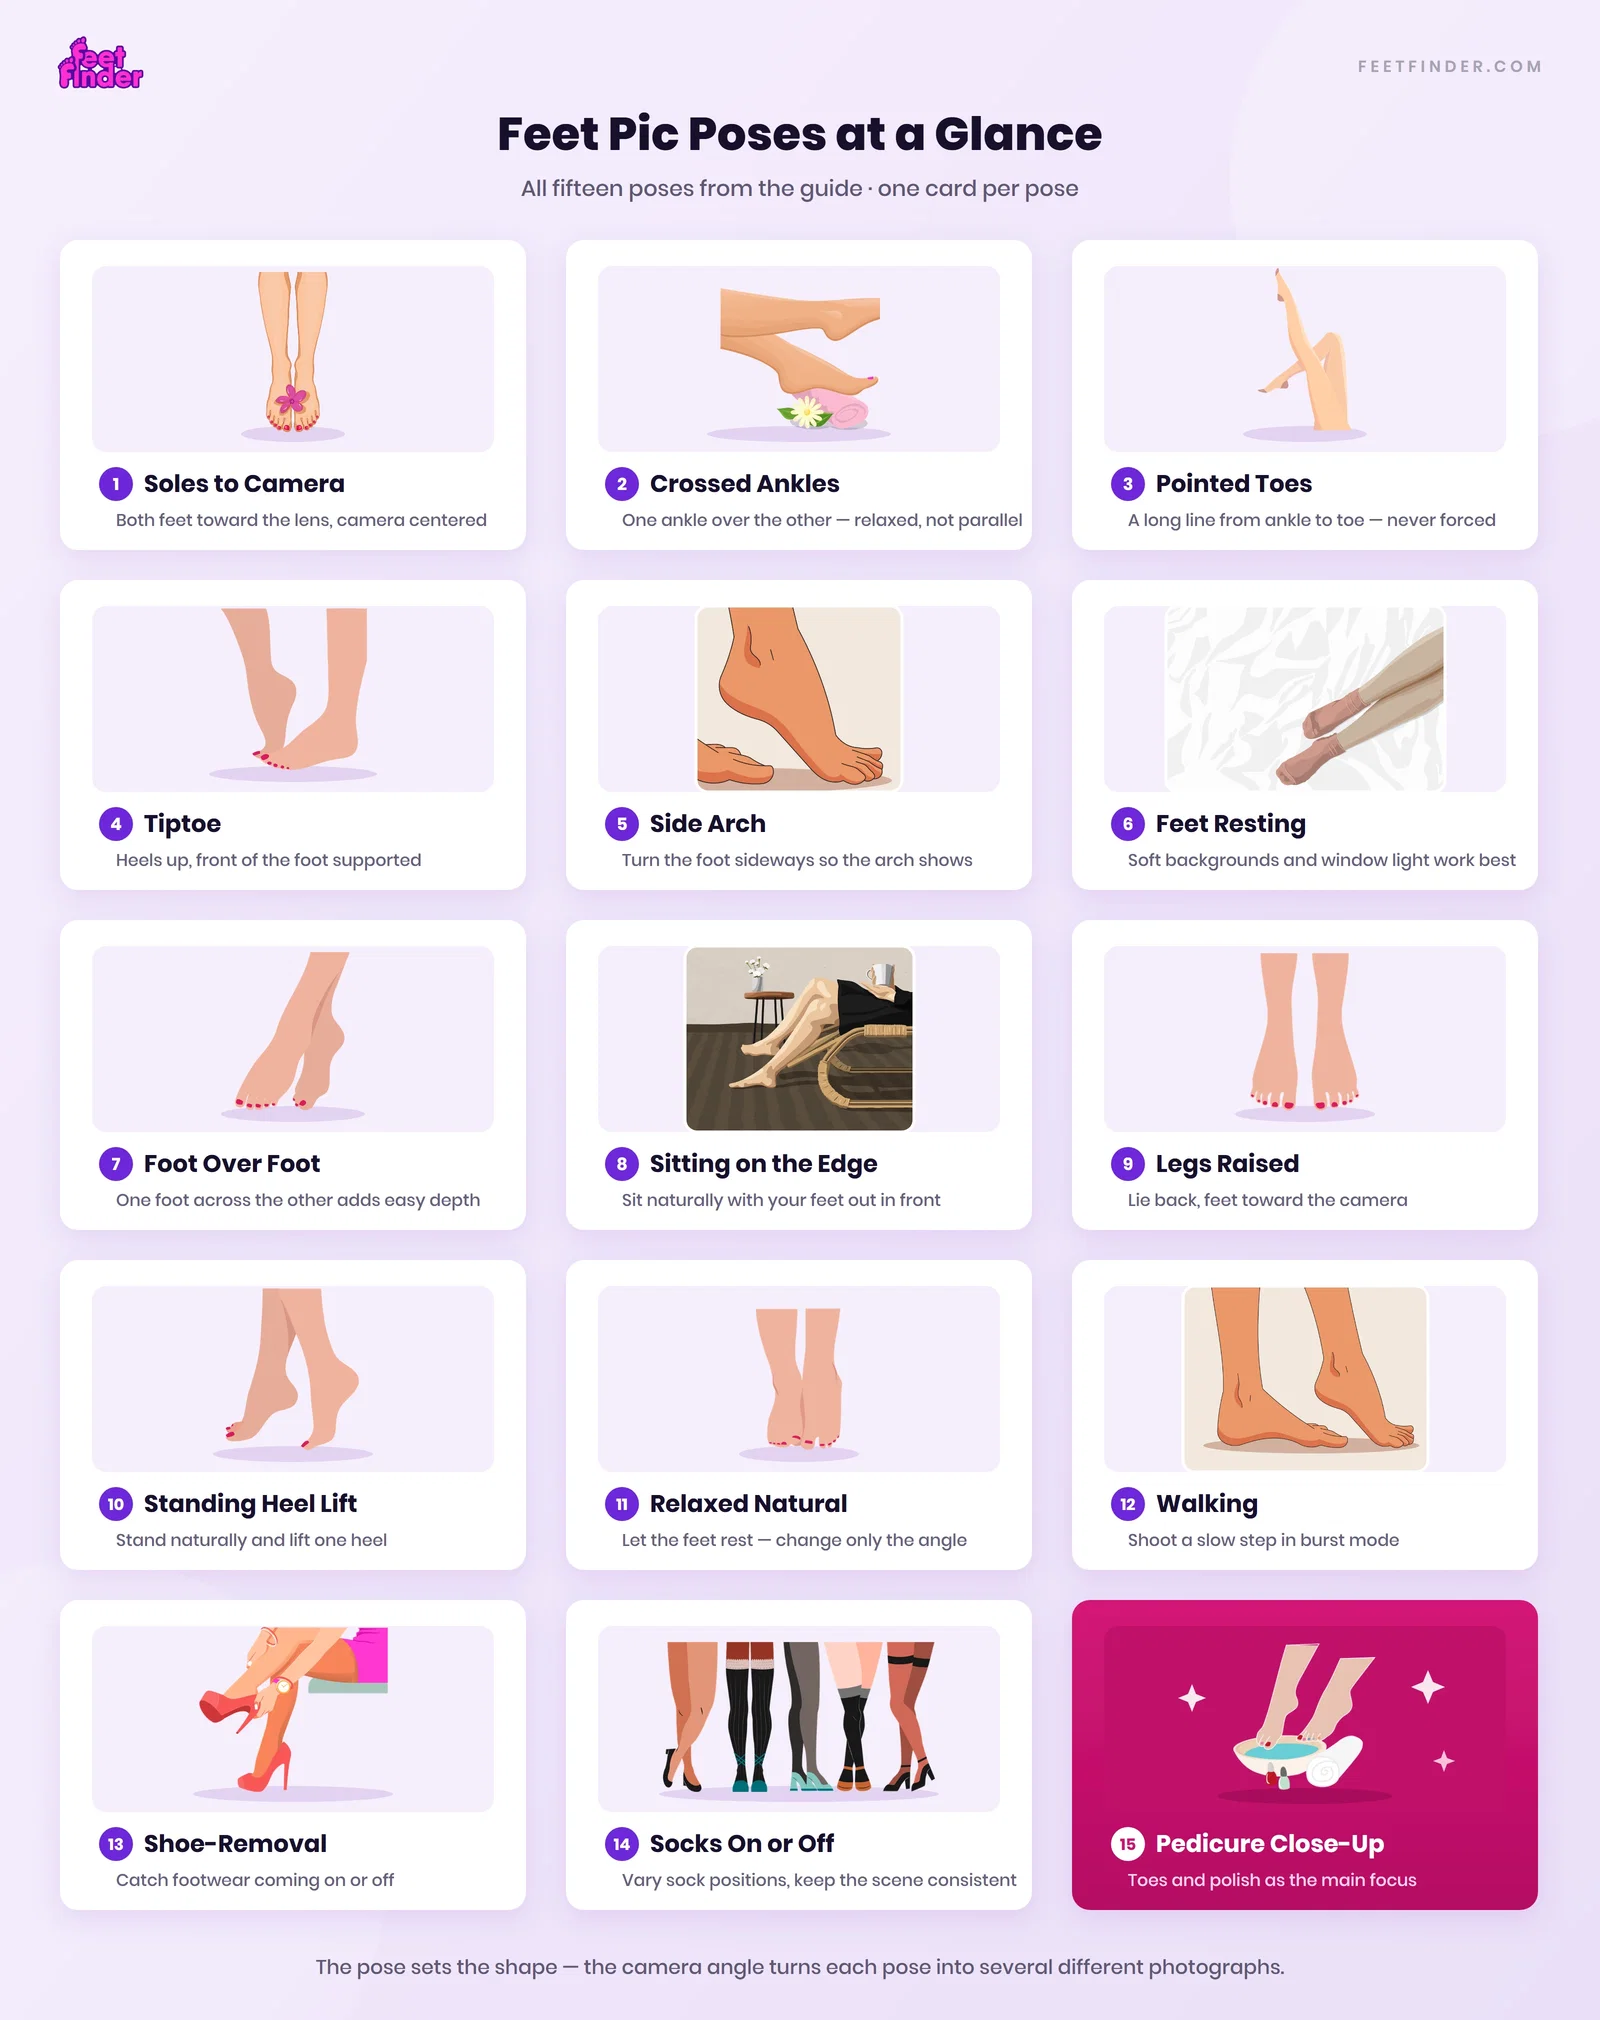
A pose refers to how the feet are positioned. The camera angle is a separate choice. That means one pose can produce several different photographs.
1. Soles Facing the Camera
Sit or lie down with both soles facing toward the lens. Keep the camera roughly centered for a symmetrical result. Avoid putting a wide-angle phone lens extremely close to the toes unless you deliberately want that perspective.
2. Crossed Ankles
Place one ankle over the other. This works barefoot, in socks or with shoes. It can look more relaxed than positioning both feet completely parallel.
3. Pointed Toes
Extend the feet and gently point the toes. This creates a longer visual line from the ankle through the foot. Do not force an uncomfortable position.
4. Tiptoe Pose
Raise your heels while keeping the front of the foot supported. A side angle can emphasize the arch. A front angle can bring more attention to the toes or footwear.
5. Side Arch Pose
Turn one foot sideways so the arch becomes visible. Try the camera slightly above, level with and below the foot.
6. Feet Resting on a Bed
Sit or lie down while letting the feet rest naturally. This setup works particularly well with softer backgrounds and window light.
7. One Foot Over the Other
Place one foot gently across the other. This creates depth without needing a complicated position.
8. Sitting on the Edge of a Bed or Chair
Sit naturally with your feet in front. Photograph from the front, the side or a lower angle. This works well for barefoot, socks and footwear.
9. Legs Raised
Lie back and raise the feet toward the camera. A tripod or phone stand makes this significantly easier when shooting alone.
10. Standing Heel Lift
Stand naturally and raise one heel. This can work well for side views and footwear-based shots.
11. Relaxed Natural Pose
Not every picture needs a dramatic pose. Let the feet rest naturally and change only the camera angle. Sometimes the simplest setup looks the most intentional.
12. Walking Pose
Take several photographs while taking a slow step. Burst mode or a timed sequence can help. Expect to discard some frames before finding the right foot position.
13. Shoe-Removal Pose
Capture a moment where footwear is being removed or put on. This can give you several variations from one setup.
14. Socks Partially On or Off
Use different sock positions without completely changing the scene. That creates variation while keeping the visual style consistent.
15. Pedicure Close-Up
Make the toes and nail polish the main focus. Use enough light for the polish color to appear accurately.
20 Feet Pic Ideas for Your Next Shoot
A pose is the position of your feet. An idea is the broader theme, styling, location or visual concept. That distinction gives you far more combinations.
1. Pedicure Theme
Choose a nail color and coordinate the background or accessories around it.
2. Heels
Photograph one pair from several angles. Include both fully worn and shoe-removal variations.
3. Sneakers
Use a casual or sporty environment. Try both seated and standing compositions.
4. Socks
Plain, patterned or textured socks can all create different looks.
5. Barefoot Outdoors
Grass, patios or other simple natural environments can add context.
6. Beach
Use sand and water as part of the background. Keep the camera protected.
7. Poolside
Use reflections and clean architectural lines where possible.
8. Spa Theme
Use clean towels, lotion or a few minimal props. Avoid turning the frame into a product display.
9. Cozy Bed
Neutral bedding and soft light are enough.
10. Seasonal Content
Use small details to suggest the season instead of overwhelming the picture with decorations.
11. Flowers
One flower or small arrangement can add color without taking attention away from the feet.
12. Anklets
Keep the rest of the image simple enough that the accessory remains visible.
13. Monochrome Styling
Use similar color tones across the background, polish and footwear.
14. Black-and-White Photography
Black and white can emphasize light, shape and contrast. Keep the original color version so you can compare both.
15. Before-and-After Pedicure
Use similar lighting and framing so the comparison is clear.
16. Nail-Color Series
Create multiple sets with different polish colors while keeping the overall photography style similar.
17. Shoe Collection
Use the same backdrop while switching footwear styles.
18. Morning Lifestyle
Combine soft window light with a simple everyday setting.
19. Minimal Studio
Use a plain background and keep the feet as the only main focal point.
20. Detail Series
Create several close-up images focusing separately on toes, soles, arches, polish and accessories.
Cute Feet Pic Ideas
If you want a softer visual style, change the styling rather than the photography fundamentals.
Cute feet pic ideas can use:
-
Pastel polish
-
Fluffy socks
-
Flowers
-
Soft blankets
-
Delicate anklets
-
Light-colored sneakers
-
Simple pastel backgrounds
Choose only a few elements. A clean image with one clear theme usually looks stronger than a photograph containing every prop at once.
Feet Pic Examples: What Makes a Good Photo?
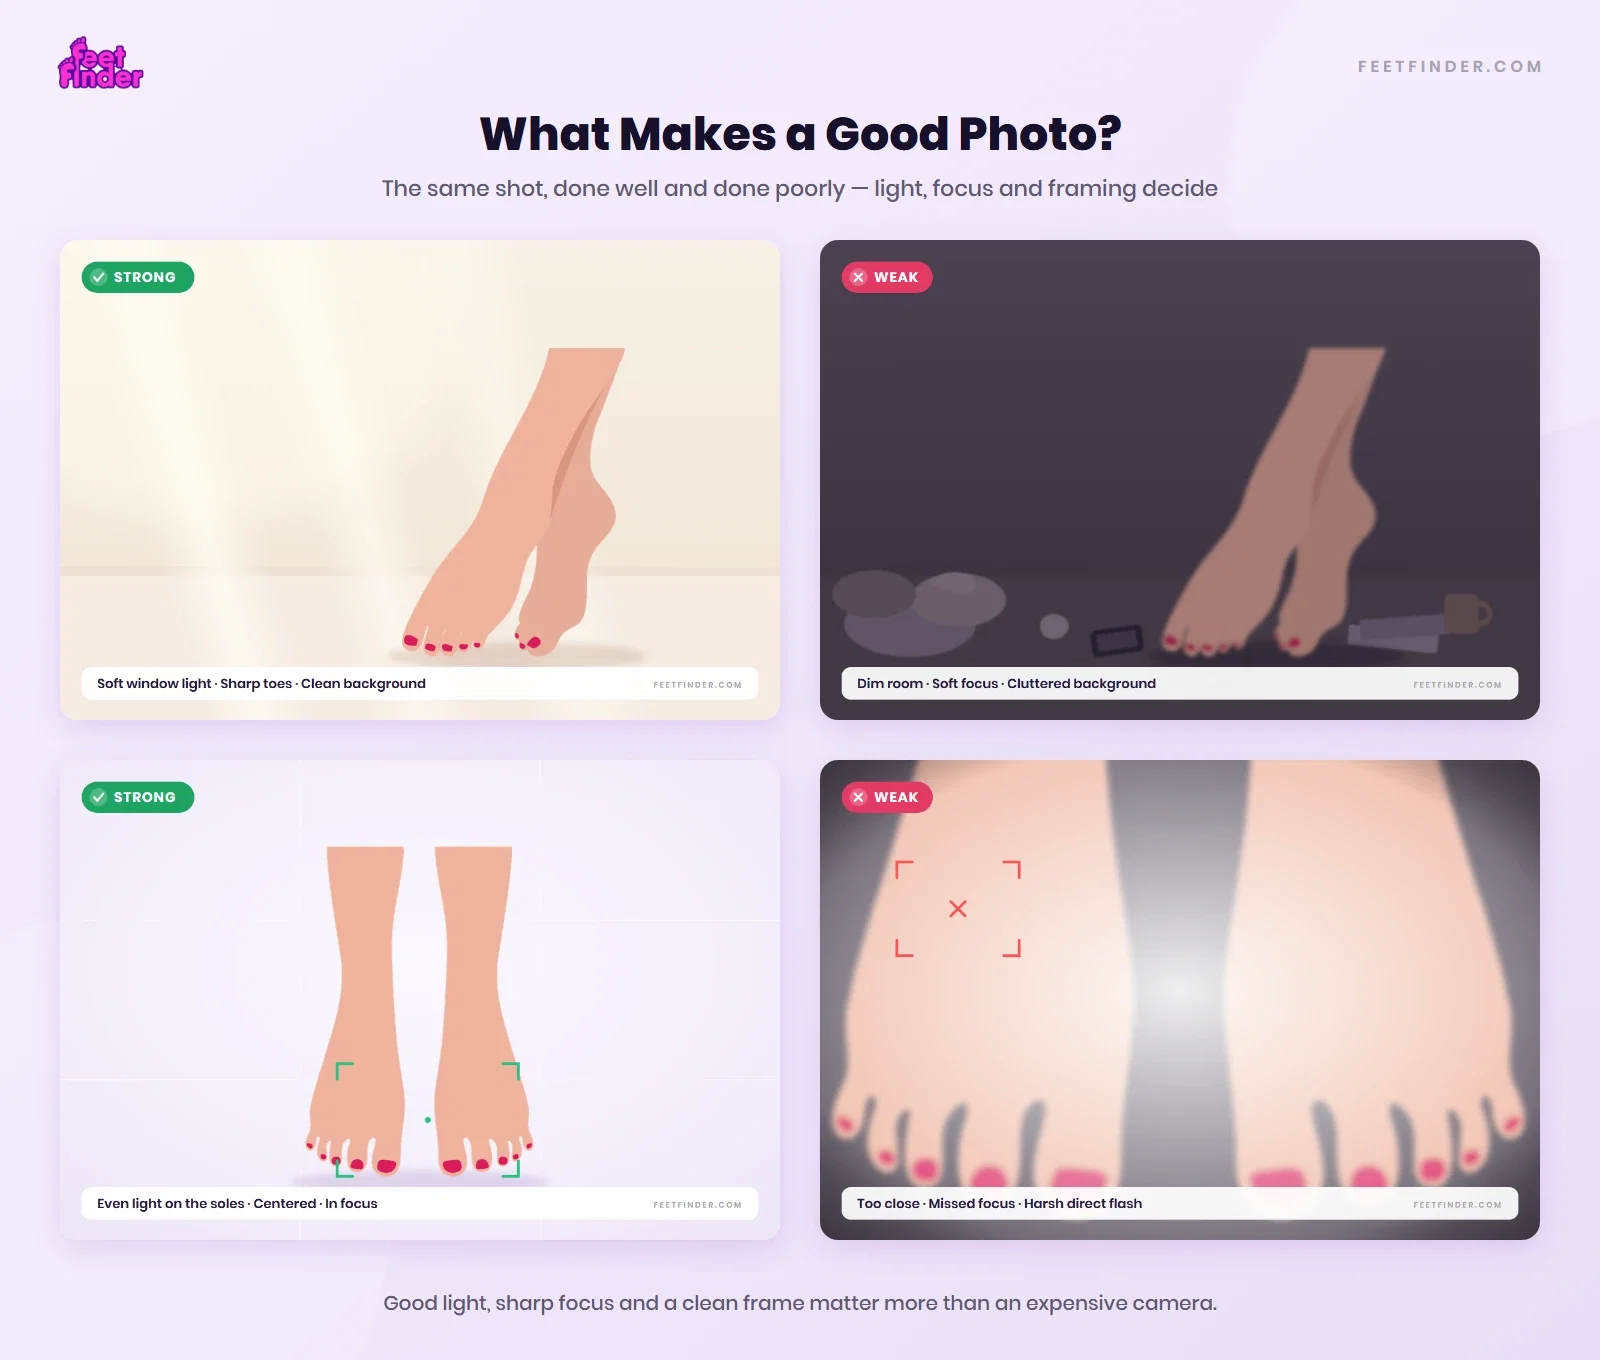
Instead of simply labeling a picture “good” or “bad,” look at what the photographer did differently.
Example 1: Strong Natural-Light Photo
Imagine a barefoot picture taken near a window. The feet are sharp, the bedding is clean, the lighting is balanced and there are no distracting objects. The photo works because the subject is immediately obvious.
Example 2: Weak Indoor Photo
The room is dark, the photo is grainy and a yellow lamp creates uneven lighting. Clothes and unrelated objects appear behind the feet. The issue is not the feet. It is the setup.
Example 3: Strong Soles Photo
The camera is positioned at an appropriate height, both feet are clearly visible and the background does not compete with them. The image feels planned.
Example 4: Weak Close-Up
The image uses excessive digital zoom, cuts off part of the toes and relies on heavy sharpening afterward. The file may be technically large, but the usable image quality is weak.
Recommended visual: Add an original “Good Feet Pic vs Weak Feet Pic” graphic showing sharp focus, clean background, balanced lighting and intentional cropping versus blur, clutter, harsh highlights and accidental cropping.
Foot Photography Techniques That Improve Results
Once you understand the basics, a few photography principles can improve your consistency.
Perspective
Objects closer to a wide-angle lens appear larger. Putting a phone extremely close to the toes can exaggerate their size compared with the rest of the foot. If you do not want that look, move the camera farther away.
Camera Height
Different shots need different camera heights. For example: soles - lower camera; pedicure - top-down camera; arch - side position. Do not keep the tripod in the same location for the entire shoot.
Focus
Tap directly on the area you want sharp. Do not assume the phone always chooses correctly.
Exposure
If bright parts of the feet lose all visible detail, lower the exposure slightly before taking the shot.
Stability
Use a tripod, phone stand, stable surface or timer. This is particularly helpful indoors.
Create Depth
Leave some distance between your feet and the background when possible. This can give the image more separation.
Photograph a Series
Once a setup is working, take front, side, soles, close-up, portrait and landscape versions. That turns one good setup into multiple useful photos.
How to Take High-Resolution Feet Pics
High resolution starts when the picture is captured. It cannot be created simply by enlarging a weak photograph afterward.
Clean the Camera Lens
A fingerprint on a phone lens can make the entire photo look soft or hazy. Clean it before every shoot.
Use Enough Light
More usable light helps the camera capture cleaner details and reduces motion blur.
Use the Main Camera When Practical
On many phones, the main rear camera produces the strongest image quality. Test your own device because camera systems vary.
Avoid Excessive Digital Zoom
Digital zoom often reduces usable detail. Move the camera physically closer when practical.
Keep the Camera Stable
A phone stand, tripod or timer can reduce unwanted movement.
Tap to Focus
Check the finished photo at full size to confirm that the intended area is actually sharp.
Keep the Original File
Avoid repeatedly sending the image through apps that heavily compress photos before you save or upload the final version.
Edit Carefully
Sharpening cannot restore detail that the camera never captured. Heavy sharpening can also create unnatural outlines.
Useful Phone Camera Settings
There is no single universal camera configuration because phones differ. Focus on what each setting does.
Focus
Tap your feet on the screen before taking the photo.
Exposure
Adjust brightness if the image is too dark or highlights are washed out.
Grid
Grid lines can help keep backgrounds and floors straight.
Portrait Mode
Portrait mode can blur the background, but inspect the result carefully. Automatic depth effects sometimes blur toes or footwear incorrectly.
HDR
HDR can help balance bright and dark areas. Compare the HDR and normal version rather than assuming one is always better.
Flash
Direct phone flash can create harsh highlights. Use softer light when possible unless hard flash is part of the intended style.
Timer
The timer is one of the most useful tools when photographing your own feet.
How to Take Feet Pics by Yourself
You do not need another person behind the camera.
A simple setup is: phone + tripod or stable surface + timer.
First decide where your feet will be positioned. Take a test shot. Check framing, focus, exposure and background.
Then use the timer and take several poses without moving the phone. A Bluetooth shutter can make the process easier. Keeping the camera fixed also creates more consistent images across the same set.
How Much Editing Should You Do?
Editing is useful when it improves an already usable photo.
Typical adjustments include:
-
Cropping
-
Straightening
-
Exposure
-
White balance
-
Mild contrast
-
Careful sharpening
Avoid relying on extreme retouching to fix a fundamentally poor photograph. Excessive smoothing, unrealistic reshaping and aggressive filters can make the final image look noticeably different from the original.
A good rule is: Editing should improve the photograph, not replace good photography.
Protect Your Privacy Before Uploading
If you want to keep your public identity separate from your content, look beyond whether your face appears.
Before uploading, inspect the picture for:
-
Mail
-
Packages
-
Mirrors
-
House numbers
-
Work or school badges
-
Family photographs
-
License plates
-
Computer screens
-
Identifiable street signs
-
Unique location clues
Also consider tattoos or other highly recognizable details.
For a more complete privacy setup, read our guide on how to sell feet pictures anonymously.
Your Profile Picture Is Different From Paid Content
A photograph that works well as paid content may not work well as your public profile image.
Profile pictures appear much smaller, so they should remain clear when displayed as a thumbnail. A detailed lifestyle photo might look great full size but become confusing as a small avatar.
If you are choosing your main seller image, see the FeetFinder profile picture guide.
Common Feet Photography Mistakes
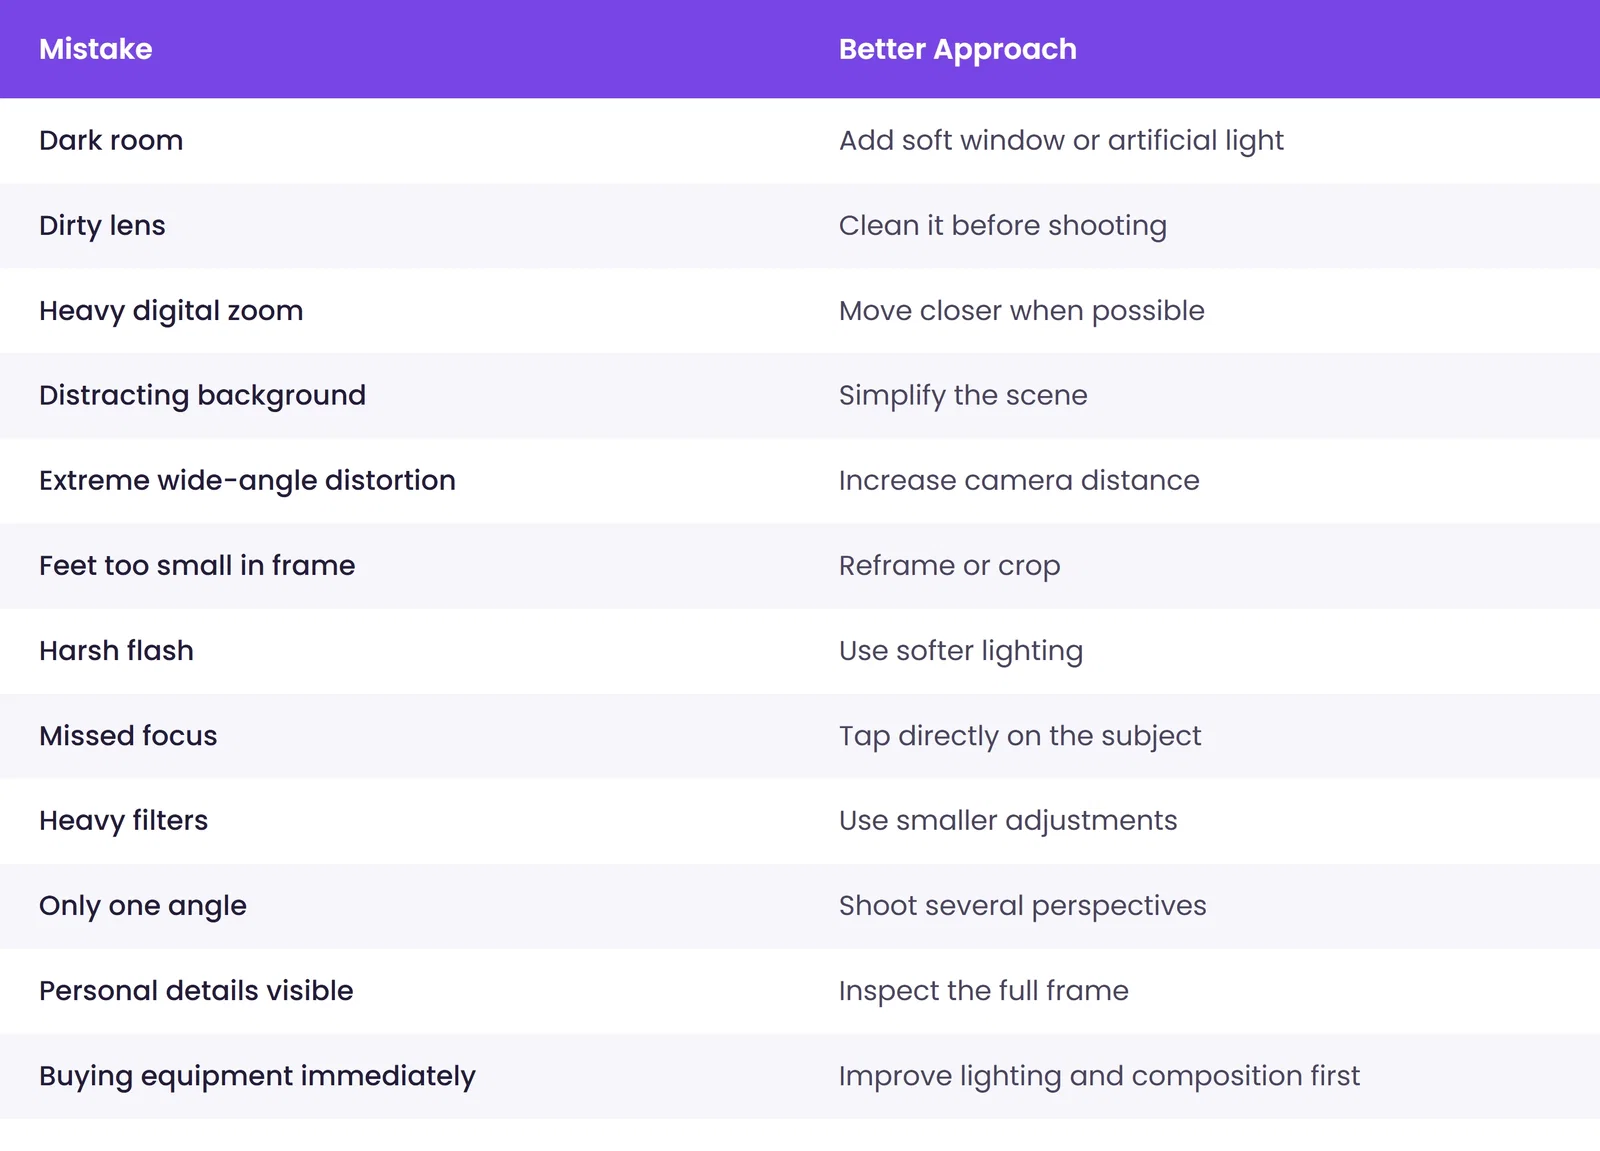
A Simple 10-Minute Feet Photo Setup
You do not need to spend an hour preparing every photograph.
First few minutes: Choose the location, clean the camera lens and remove clutter.
Next few minutes: Check the lighting and take one test photo.
Then: Photograph multiple poses and angles without rebuilding the setup.
Before finishing: Zoom into the final images and check sharpness, exposure, crop, background and privacy.
This is much easier than discovering a problem after the shoot is finished.
What Should Beginners Photograph First?
If too many content ideas are making the first shoot complicated, simplify it.
-
One clean background
-
Natural window light
-
One barefoot top-down photograph
-
One side angle
-
One soles photo
-
One close-up
-
One footwear variation
That gives you several different images without requiring a complex setup. Once you know what you enjoy creating, you can add more styling and themes.
Does Better Photography Mean Higher Earnings?
Not automatically.
Better photography can improve presentation, but there is no fixed rule saying a sharper photograph will sell for a specific amount.
Pricing can depend on the content format, customization, buyer demand, seller profile, platform fees and other marketplace factors.
If you want to work on pricing next, read our guide explaining how much feet pics sell for.
Ready to Turn Your Photos Into Listings?
Photography is only the content-creation part.
Once you have a consistent set of clear images, the next step is building your profile, organizing listings, setting prices and deciding how you want to present your content to buyers.
If you want the full account and seller setup process, read the FeetFinder seller guide.
Once your photos are ready and you understand the process, you can sell feet pics through FeetFinder and start building your seller profile.
Frequently Asked Questions
How Do You Take Good Feet Pics?
Use sufficient light, clean your camera lens, choose a simple background, tap on the feet to focus and keep the camera stable. Take several angles and inspect the images at full size before uploading.
What Are The Best Feet Pic Poses?
Useful poses include soles facing the camera, crossed ankles, pointed toes, tiptoe poses, side-arch shots, feet resting on a bed, one foot over the other and pedicure close-ups.
What Is The Best Angle For Feet Pictures?
There is no single best angle. Top-down angles work well for pedicures and toes, side angles can highlight arches and footwear, while straight-on angles work well for soles.
What Lighting Is Best For Feet Pictures?
Soft natural window light is one of the easiest options for beginners. Ring lights and softboxes can provide more consistent indoor lighting.
Can I Take Good Feet Pictures With A Phone?
Yes. A recent smartphone can create high-quality feet pictures when the lighting, focus, framing and camera stability are handled properly.
How Do I Take Feet Pics By Myself?
Use a tripod or stable surface, frame the shot, set focus and exposure, and then use a timer or Bluetooth shutter.
How Do I Take High-Resolution Feet Pictures?
Use sufficient light, clean the lens, avoid unnecessary digital zoom, stabilize the camera, focus manually where needed and preserve the original image file.
What Background Should I Use?
Use a background that fits the theme but does not compete with the feet. Clean bedding, neutral walls, wood floors, rugs and simple outdoor settings can all work.
Should I Use Flash?
Direct flash can create harsh highlights. Softer natural or artificial light is generally easier to control, although flash can work if the harder look is intentional.
Do Feet Pictures Need To Show Your Face?
No. Feet pictures can be framed without showing your face. If privacy matters, check the entire image for reflections, documents, location clues and identifying objects before uploading.
Bottom Line
You do not need expensive equipment to take good feet pics.
Start with the fundamentals: good lighting, sharp focus, a clean background and an intentional angle.
Once those are working, experiment with different poses, themes, footwear, backgrounds and editing styles.
The biggest improvement usually comes from paying attention to the entire image rather than focusing only on the feet.
Take one test photograph. Review it. Adjust the light, background or camera. Then take several variations while the setup is already working.
For your public seller image, use the FeetFinder profile picture guide.
For privacy, read how to sell feet pictures anonymously.
For pricing, see how much feet pics sell for.
And for the complete seller process after your content is ready, read the FeetFinder seller guide.
Ready to Turn Your Photos Into Listings?
Once you have a consistent set of clear images, the next step is setting up your profile and pricing.
Start Selling on FeetFinder →Reviewed & written by
Trevor
Trevor specializes in creating practical how-to guides for new content creators. His work focuses on profile optimization, attracting buyers, avoiding common mistakes, and understanding platform policies. Rather than relying on marketing claims, he emphas
Knock Knock!! Let Your Feet Earn Money
Join thousands of users who are making money by buying and selling feet pictures in a safe, secure platform. Start your journey today with FeetFinder's trusted marketplace.